Monday, 16 March 2015

Explosive props: how to make your own fake TNT style dynamite prop

For anyone planning a Wild-west / Frontier party or looking for props for a play or production here is a guide on how to make it quickly and for very little cost.


Apologies in advance for the grainy images, it was quite late at night and needed these by morning ;)


Friday, 15 August 2014

Competition winner

First competition run on the Facebook page, to win this Sunshine "HAPPY Birthday" card.

Every liker who commented was assigned a number according to chronological order and random.org was used to select a winner

Congratulations:
.
.
.
.
.
.
.
.
.
.
.
.
.
.
.
.
.

*Joni Riley*

Please contact me ASAP with your UK postal address and I will get your card out to you :)

Tuesday, 15 July 2014

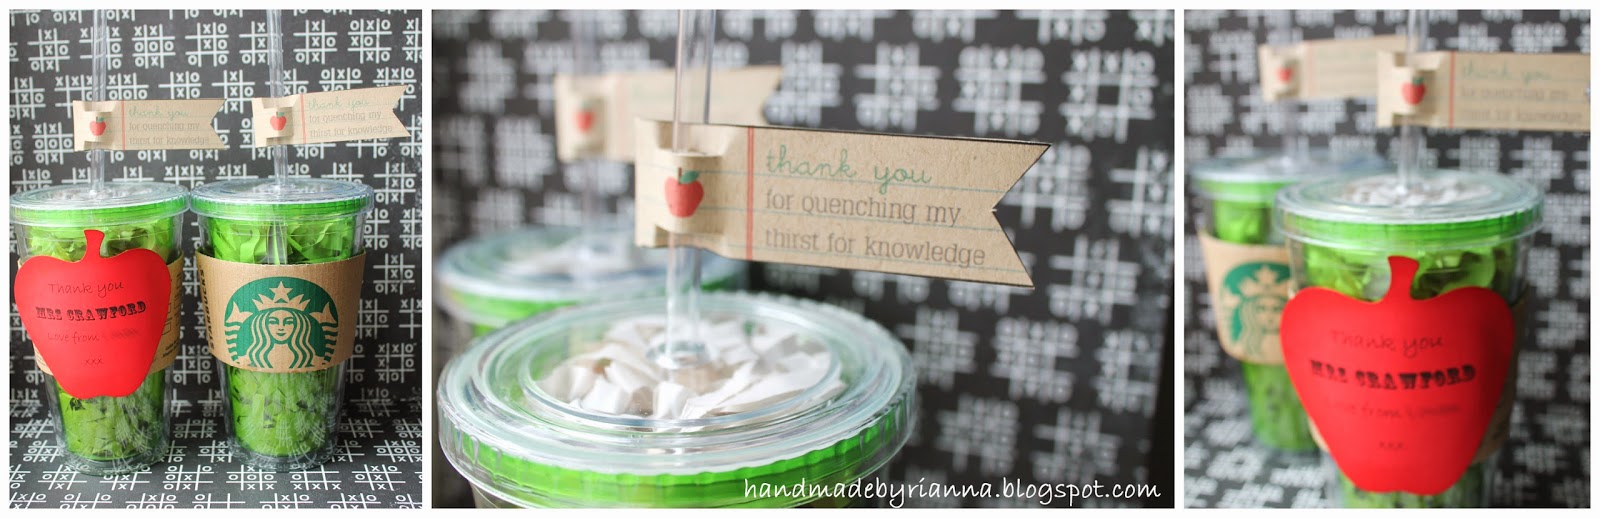
Teacher Gifts and cards 2014

It's that time of year again, another school year coming to an end, and you think everything should be calming down and wrapped up for the summer. But no, your 5 year old needs a costume for their party, not to mention Thank You cards for Teachers, TA's, parent helpers.... Oh and a thoughtful teachers gift! Thank goodness for pinterest!

Firstly my Teacher gifts: I had seen this idea and free printable from Lisa Storms a while ago but not seen any of the tumblers in the UK. Found these apple green ones in The Range and got to work. I printed the free download onto kraft card for the straw, shredded brown and ivory paper to fill the cup with faux "iced latte"


Probably more of an expense than planned but I ended up buying starbucks coffee vouchers for each of the 3 teachers and asked if I could have a cup-holder with each. The cup-holders didn't quite fit, but that gave me the opportunity to fill the void with a die-cut apple printed with the teacher's name and thank you message.

Next, an orginal idea I had (but so simple I'm sure it will have been done somewhere before. I got Little Lady to make her own cards this year:


I printed the teachers name on the front, and a little quote she has said about each teacher. We then cut out triangles from my scraps of scrapbook papers, and then I gave her the felt tips and told her the triangles were dresses, could she draw the head/arms/legs and write her own name inside. I am so pleased with the result they look great, didn't take long and every card is unique :)


Monday, 12 May 2014

Frozen Party: The Invitations

As you may have gathered, despite the May weather here finally starting to brighten up, our house is becoming a flurry of snowflake themed crafting, no I'm not getting prepared for Christmas early, we are planning a Frozen Party :) And like many Parents up and down the country I am having to work harder than usual to find theme related paraphernalia, because of the sheer demand for all things Frozen being at a pinnacle and the fact that shops everywhere seem to have the bizarre notion that snowflakes belong in winter ;)

So I am obviously making a lot of my own things for the Party..... who am I kidding - I'd have been doing that anyway! So first up (not including that Glass bottle favor post, because who makes favors before they have actually invited anyone...) is the invites. I had some idea that I could do some Anna and some Elsa, but the Elsa ones were so pretty I got a bit carried away, and if I had been thinking I would have made some Olaf ones for the boys.


Firstly I should point out that as the Elsa image is a Disney Trademark, therefore copyright, so I can not reproduce these for sale. However that's good news for all of you crafters as it does mean I can share the details of how to make it....

Saturday, 10 May 2014

Frozen Party: Glass bottle favours

Firstly, my apologies I have been a blog deserter for favour of quick updates on my facebook page and completely neglected my updates. Somehow I still haven't added a party round up for the TMNT party J had back in November let alone Christmas - must try harder!

I am brought back here today because I have been planning Miss L's June birthday :) She wants the 'hot trend' of the moment: A Disney Frozen Party as a theme.

Firstly ... Do you know how hard it is just to buy snowflake related items in April/May?

The Disney store itself seems ill prepared for this sudden run away merchandising success, our local shop sells out of anything Elsa related before it even makes it to the shop floor, and anything from a certain auction site is priced high due to supply and demand. So I will be making everything from scratch in a largely bluey/white theme. The only saving grace is that we have managed to get our hands on one of the very elusive dresses, so at least I won't be needing my sewing machine this time around :)


Obviously I can't share too many party details yet as I'd hate to spoil the surprise for any of the attendees, but I can share this one: Glass bottle favors for the Party bags.


OK, so this isn't going to be some big turorial of a post, because if you know how to pour small things into glass bottles you are pretty much sorted, you just need to decide what to fill it with.


Firstly I tried, faux pearls, silver beads, glitter and tiny snowflake confetti, the idea being that the girls could use them as ornaments, and this one is certainly going on our tree this year.


I did ultimately shelve this idea for the party thou, as I was worried that some of the 3-4 year olds might accidentally ingest the contents. However this probably wouldn't be an issue for older party goers or if you included a safety tag/label.


This brought me to my next bright idea: edible contents. Here I've used Bubble gum millions - but any theme coloured tiny sweet or sherbert would do. I've added a paper punch snowflake and gem to keep it in the Frozen theme.

Other ideas that would work well might be just glitter, beads, feathers, or even make a melted snowman: (use firmo to make a tiny carrot nose, twigs and coal lumps and fill the bottle with water so they float). Good luck, and I hope this gives you yet another idea in your hunt for D.I.Y party perfection.


ps- apologies for the awful photo quality for some reason I can't photograph these in good light today!

Sunday, 9 March 2014

Mojo Monday - #335 Steampunk and burlap

Nothing like a bit of steam punk and burlap :) The moment I saw this week's Mojomonday challenge I knew exactly what I wanted to do with it.


This is really my type of card,  I even managed to sneak a little signature twine in :D


Here is this week's sketch if you fancy a try yourself, worth a visit to see all the other innovative entries [click here]


Sunday, 9 February 2014

Mojo Monday - #331

I don't mind admitting that I've had a bit of a creative block when it comes to card making recently an seemingly lost my confidence after a Chritmas crafting burnout. What better way to get my Crafty Mojo back than to take part in a MojoMonday challenge?


I was in need Valentine's day card for next week and this challenge provided the perfect excuse to make one early, get my creative juices flowing and use up some of my scraps at the same time?

Here is this week's Sketch from Julee if you're feeling inspired to have a go yourself, and check out all the other lovely entries [HERE].

I'm back!

Been far too long since my last blog entry. I still have two kids parties to talk about, not to mention all the crafting we've been up to. Lots of quick updates on Facebook and Instragram but need to get myself into gear and actually start blogging again. Not helped by being full of cough and cold since January, hoping to shift it soon.


:)


Here is all of my digital information for those wishing to follow on other digital mediums;


Facebook :: www.facebook.com/pages/Hand-Made-By-Rianna/170168099710848
Twitter :: @handmade_by_R
 Etsy:
www.handmadebyrianna.com
Instagram :: @handmadebyrianna

Wednesday, 21 August 2013

Jack's 6th Birthday card: Angry Birds

My Nephew Jack is turning 6 in a few weeks! I found this fun Angry Birds punch art tutorial on pinterest and had to give it a try. I decided to make it into a wobbler so it jiggles about and looks like it is flying through the air.

 
I didn't have all the punches suggested so I improvised using Spellbinders Classic Circles, a couple of woodware circle punches, the heart from the Sizzix Home Sweet Home die, I didn't have any triangle punches or dies so I cut two squares in half for the beak and then I hand cut a 'V' shape for the eyebrows and a fork shape for his tail. Really simple.


The background is made with distress inks; Squeezed Lemon and Spice Marigold with Moved Lawn on the edges of the grass, a name and number, and then the - and ta da!
 
I hope he like it :)
 
*- Please not that obviously these will NOT be available in my etsy shop, because a) this is someone else's tutorial and b) Angry Birds is a registered trademark, but feel free to give it a try your self, the punch art was really simple and on it's own might make a great gift tag or party invitation.

Tuesday, 2 July 2013

Wedding Stationary: Sneak Peak behind the scenes

Firstly apologies for the lack of blog updates, between facepainting at the school summer fair, Miss L's Birthday and family illnesses I haven't had a lot of time for a proper update. I have been popping a few instant updates up on my facebook page for anyone following me, and thought I'd share a few snippets of 'behind the scenes' from the wedding stationary I've been working on for a friend:


Not quite sure how I will to post the finished stationary collection, as I need to protect the couple's privacy, but I will try to post a post-wedding update with lots of the little details I've been working on.

Monday, 3 June 2013

MLP Party: Rainbow Dash Party Invites

My little Pony themed Invites for a paper crafter are a little tricky .... Do you attempt to cut out a whole pony? Do you go for a general girlie invite and add a pony at the end? Cutie Marks? Or just give in and print something?


As those of you following on Facebook will have seen I eventually went down the Rainbow route. In this case it was for Rainbow Dash the pony, but these could easily be used for a generic Rainbow Party.
 

Thursday, 16 May 2013

MLP Party: How to enlarge an image by hand for a Party 'Pin the Tail on the ...'

Planning a party? Really want a 'pin-the-tail' game and can't find the right one to fit your theme? No problem, just scale up an image and you can make your own! In fact this technique has a number of applications and will help you to copy or enlarge any image by hand. Great for cards to send into kids TV channels, posters, face-in-hole photo boards and even full scale wall murals :D


What you'll need:
- An image to copy
- A large sheet of paper (eg-A2)
- A pencil
- A good eraser
- A ruler
- Pencils/Paint/Felt tips


Firstly you need to find a good colour image of the character you want to use. Consider which item or part of them you want your guests to pin to the background image; for example; for a pony it might be the tail, for a clown a nose, etc etc. Make sure the position of this is prominent in the photo - we are not going to draw it but it helps if you can clearly see the object should be.

Thursday, 18 April 2013

In sympathy cards

We had some very sad news last weekend, a family member sadly passed away. They will be very much missed by everyone who knew them. So there may not be too many updates from me for a little while, but I just wanted to share the simple card I made for some of my relatives.
 
 
It's always tricky to get Bereavement cards right, you want to keep your design simple and clean but also be uplifting. I hope I got the balence right.


Saturday, 6 April 2013

Mojo Monday #287

After a really long day yesterday I was in need of some 'me time' and usually that means locking myself in my craft room or opening a bottle of wine and watching a girlie movie. However I was lacking craft inspiration and as I'm on a health kick I decided against the wine, lol. Rather than attempt to keep working on one of my current projects I decided to open my scrap paper drawer and just have some fun making a card for this week's Mojomonday competition. Here is the original sketch:

I mostly used scraps from my MME boys crazy stash, as I love the colours, and distressed the edges with Brushed Corduroy, Ripe Persimmon and Broken China. I used my Spellbinders Gears dies for the red and orange cogs. The sentiment was stamped on lined Kraft using Ranger Archival Ink in Jet Black I even experimented with my new Fiskars eyelet setting tools as the embellishment detail. I substituted the scalloped circle for a flattened bottle top to which I added a punched circle of the scrapbook paper and filled with resin for a glossy finish. Finally I added the twine for some texture. Here is the finished card:
  

Check out all the great entries at Mojomonday#287


Thursday, 4 April 2013

New Facebook page!

I've finally launched a facebook page linking the blog and etsy shop.
 
For more informal updates, the lastest news and the occasional give away just head over to facebook and 'like' my page :)
 
And don't forget you can follow on twitter too.

Thursday, 28 March 2013

Happy 1st Birthday Freddie

I can't believe it's been a year since I sent a 'Welcome to the world baby Freddie' card to Freddie's parents, but here we are on birthday number 1!


Again I found this fab and fun scrapbooking paper at my local craft store Sparkledreams, and picked out the rocket from the original design as a handstamped rocket on kraft. I cut the '1' out by hand.


I've refined the design a little and a similar card is now available in my ETSY SHOP :)
 

Thursday, 21 March 2013

Mother's day cards

Admittedly this post is a few weeks late, but here is a look at the two variations of Mother's Day cards I did this year. Both where designed around my new Bigz Birdhouse die from Sizzix.
 
 
The cards are a admittedly little on the 'twee' side of my usual work but I like to think the use of old book pages and distress inks help give it a more vintage look.

Wednesday, 20 March 2013

Captain America to the rescue!

Yet another mask completed using designs from Jessica over at Cutesy Crafts :) In fact I think we have the whole set (must post them soon). This time it's Captain America, and Josh likes this one much better than the mask that came with the costume!
 
 
The only changes I made to the original were a little bit of backstitch detail on the feathers and I used xcut's Leaf die to cut the eyes (smallest die), the rest is handsewn and blanket stitched all around the edge.


Red Nose Day 2013 :) A quick way to make a design into a t-shirt...

J's nursery where having a 'wear red and donate £1' day for Comic Relief day and he wanted to dress up. He didn't like the official t-shirts at Tkmaxx but loved the red noses (we ended up with one of each nose, two plush toys and several pez dispensers.)
If you want to recreate an image onto a t-shirt here is a rough guide of what I did. Do beware of using images that are copyright, and keep in mind that felt does not wash or wear well in the long run, so for projects that need to last perhaps use fabric and overlock or hem the edges.

Thursday, 28 February 2013

Mojo Monday #282: Baby Arrival Card

Seems like forever since I headed over to MojoMonday for a bit of a crafty challenge. I've been soo busy with the kids and I've been helping a dear friend of mine with her wedding invitations, and when I do need to make a card my brain has been a little scattered lately, so what better way to top up my crafty mojo than a Mojomonday challenge? Mojo Monday 282 to be precised. It's the last Monday in the Month so it's circle or square time :) This week's sketch was designed by Julee, and it is both simple yet striking.
 
 
 Isn't it a nice to have someone else worry about the layout while you just need to experiment with colours, patterns and textures? Often I get the colours and a vague idea about composition and have to spend the majority of my time experimenting with layout. I needed a card for a family friend I grew up with in Hong Kong who has just had a baby, and had this fab paper just waiting for the next little bundle of joy to appear.
 
 
I used the fab alphabet scrapbook paper (can't remember who it's by, might be MME) as my main feature and the added kraft card and the reverse of the gears card I used in my last post. I stamped the little feet image using Ranger Archival ink in coffee and aged the edges with Distress Inks: Broken China and Vintage Photo.
 
Please excuse the quick photoshop job on the latter half of the name, I always like to include the baby's full name as a keepsake and so I've obscured it for the family's privacy.