Tuesday 28 August 2012

New card: Happy house moving Mum!!

It's been about 8 months in process but today my Mum's new house has finally gone through and she has the keys in her hands! So what better excuse to create a new 'new home' card :D
 
 
I distressed some cardstock and added the vintage key stamp to the background in Archival - Jet Black. Then added the orgami house - made from an upcycled book page which was also distressed. Added a bright background and key charm, bottle cap, dovecraft flower and ribbon.

Friday 24 August 2012

Fairy Toadstool Card: Happy Birthday Edie-Jean

Time for an other distress ink card :) This time a girlie version - desinged for my cousin's daughter Edie-Jean's Birthday on Saturday. I've been dying to use these new little fairy charms and ended up designing the card around it.
 
 
The Distress ink colours were: Victorian Velvet and Brushed Cordoray. With an upcycled book rosette, bottle cap name, masked toadstool and tiny personalised letter from the fairies :D
 

What's in your filofax Friday? #2

Well, it looks like Santa came early. I showed Mr S the state of my old filofax and as he's just spent a small fortune on new running gear for the Great Yorkshire Run he offered to get me a new one ...
 
 
I'm rather embarrassed about the amount of time I've spent hugging it! lol. It's the pocket sized Malden in vintage pink and it's gorgeous.


Most of the pages are still the same, my 21p memo pad fits perfectly into the back pocket and I've used some black and white scrapbook papers to make some smart dividers (top right) - including a section for card making. For this section I resized a distress ink colour chart (middle right) from ranger, a memento ink colour chart (bottom right) which I downloaded from Ellen Hutson and I created some 'card design' sheets for sketching down my ideas when out and about (middle left) again I based this on the templates from philofaxy :)

Wednesday 22 August 2012

Distress Ink colour chart: The start of an obcession

Last month I finally dove head first into the wonderful world of Tim Holtz's 'Distress inks' from Ranger. I have to admit I previously I thought they were just over priced ink colours and never gave them a second thought, then I discovered the series of Tim Holtz videos on YouTube and I knew I had to start collecting them. Perfect for the aged effects I've spent years attempting with good old fashioned tea bags (lol!) and that's not beginning to mention the blending and water blotting techniques.


As an avid collector and list maker I was pleased to find that the ranger website offer a free A4 pdf colour chart. I love the idea of checking the colours off as I collect them. I've already printed one for my folder and resized one for my filofax (see this Friday's filofax update).


While looking at ways to store my new inks I discovered Britta's series on 'No-Stress Distress Inks' and I instantly adopted her method for labelling the sides of the inks  with the titles and colour as its so much easier to keep track of them once stacked. I also liked her method of storing the foam pads on Velcro on a large version of the ranger colour chart, but wanted to use a bigger foam board - so I ended up printing her enlarged version, cutting the grid out, covering the board in brown paper and stencilling the title in sharpie marker and adding addition sets of boxes for each of the 'limited edition' seasonal colours (the titles are stamped on).

So far I have: Brushed Corduroy, Peeled Paint, Pine Needles, Broken China, Black Soot, Victorian Velvet, Tumbled Glass, Antique Linen, and Walnut Stain. I already have my eye on the next 3 ;)

Friday 17 August 2012

Ben's Birthday Card: Broken China & Peeled Paint


My oldest friend's little boy turns 3 this weekend - I've known her since we were 4 in the naughty corner at Kindergartern in Germany! I don't get to see her as often as I'd like and wanted to send a nice handmade card for Benjamin. Plus, I've been dying to use some of the more colourful inks in my slowly growing collection of Tim Holz Distress Inks, not to mention more experiments with flatterned bottle caps ;)
Using distress inks: Brushed Cororoy, Broken China & Peeled Paint.

What's in your Filofax Friday?

OK, probably not going to become a regular feature, lol, but I have finally resorected my filofax ... my 2005 'Popi' pocket sized organiser - which to be honest has seen some better days (see below right for the massive fissure in the vinyl) - but fingers crossed if it gets used religiously I may get a replacement for Christmas this year .... and Mr S if you're reading this the Malden Pocket Organiser in Vintage Pink is really rather nice ;)


After throwing away the old very outdated diary pages and buying the 2012-2013 academic refill I started adding all important dates and appointments along with the usual colour coded dots from my family organiser/calender at home (blue for birthdays, red for holidays/bank holidays, yellow for doctors, orange for dentists, green for clubs, pink for parties etc). I hole punched a sheet of stickers for the back too so I always have them handy (below, top). And I added some sticky tabs to mark important dates like the kids birthdays and the next hospital appointment to make them easy to flip to.

Then I started to print my own customised pages using a plain template I found at Philofaxy - a great resource for free filofax printable whatever size organiser you use.
.
I made an inside cover (1st photo, top right), breakdown information sheet, emergency information sheet (2nd photo, middle right).
.
I also discovered that I could print any PDF file in filofax size by changing the page size selected on page setup, so for my pocket sized organiser I selected 3.5 x 5inch and (assuming there wasn't much information near the left margin) this printed out perfectly proportioned. So I've been on the lookout for useful PDF resources like conversion tables, my son's school term dates and local pool swimming times (2nd image, middle left).
.
To mark weeks of school holidays I used a blending tool and some red distress ink and stained the inside of each holiday week red (2nd photo, bottom right) and used some themed stamps to mark some important dates like Valentines day and Christmas.


Wednesday 15 August 2012

Play to Write-Write to Read Wednesday (week 1)

I found Mackenzie's blog last night and have decided to get involved in her "Play to Write-Write to Read" Wednesday playgroup sessions with Josh. He can write his own name most of the time, knows the phonics song and can recognise most letters so this sounded like a great next step - the lessons are really well thought out and not something I would have tried on my own.

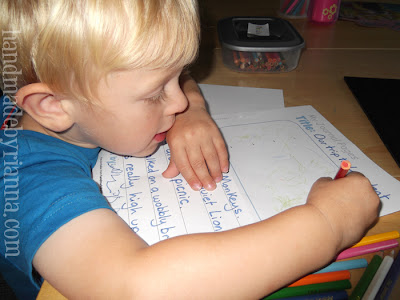
We started today with the 'Partner Journaling' part of the week 1 challenge, where you encourage your child to talk about an activity or trip you've done together recently and help them to write sentences about the experience and then draw a picture.

Not only is this a great keepsake for the future, but shows that spoken words can be written words, helps them access short term memory, improves vocabulary and is a great all around bonding exercises.

Sadly we didn't have chance to go shopping for a journal to write in, but after my spate of printable creations i ended up making worksheets we can hole punch and add to a binder. On sheet I also made sure I had gaps for 'title' and 'date' (for my own reference) and I left room at the bottom for him to write his own name. If anyone wants to download these to use at home,the links are below :)

Download in: [BLUE] [GREEN] [PINK] [RED] [PURPLE] [ORANGE]
[Font credit: Janda Manatee Soild]

 
We choose to write about our trip to Longleat Safari park on Friday. It did make me very paranoid about my own handwriting and spelling considering my own childhood Dyslexia, but it was great to get him talking animatedly and having a proper discussion with him. We decided on what each sentence should say and I enunciated each word as I wrote it. I love the fact he choose to describe the Lions we saw as being 'quiet' and he ended up drawing a lovely picture of a green Lion laying on grass and leaves. 


I love this idea, and will be adding more sheets to the collection as he does them - he's already looking forward to writing a page about the car rally he's going to on Saturday.

Looking forward to trying the lines and mazes part of last week's task in the morning and then on to lesson 2. 


Tuesday 14 August 2012

Boys will be boys: Simple printable target

At the shop today, after much debating my Son finally picked a magazine: Spiderman - and came with one of those freebie plastic guns that fire styrofoam 'darts'. The second we got home he tore it open and with some help loading was firing it all around the house -followed by missing darts, tears and long conversations on the subject of why you mustn't fire these things at people, cats and decorative objects.


Potty training : Free printable chart

Well, it's potty train time again in our household. Little Lady has been randomly choosing to do wees on the potty since Christmas but has resisted any attempt at serious potty training, with a month till Josh starts nursery and warm enough weather for Lowie to wander around the house in pants and a t-shirt I decided to take the plunge.
With Josh I stayed away from sweets/stickers and other reward style potty training techniques as I was worried he would always expect a reward for doing it - and it worked OK but he wasn't really ready till he was almost 3. This time I was thinking about using  a reward chart I saw some in shops and a few free downloadable ones from companies and blogs alike but didn't see anything with the format I was looking for, so I ended up making my own.

.
It's might not be perfect for everyone - I made this for my daughter but hopefully someone else will find it useful. It has the 7 days of the week, 3 weeks per sheet (or possibly 3 kids per sheet for childminders or triplets) and space for lots of small circle or star stickers each day. I'm going to get mine laminated but currently have it mounted in a clear pocket file - so that the sheet is re-usable, but you could just print a new sheet every 3 weeks.


To download your own sheets simply click on the appropriate sheet above and either choose to save for later or print. When printing make sure to check the paper size and print preview. I hope this resource helps!

We've just started using it today, and she's got 2 stars and had one little accident.

Monday 13 August 2012

Handmade card: Happy Birthday Martin

Another Birthday, a new card! Today's I'm wishing my good friend Martin a Very Happy Birthday!!! Figured he'd be celebrating in London this weekend so was inspired by this Paper Cellar background featuring beer tankards and embellished with bottle caps. Again quite a Grungey card - getting the most out of my slowly growning collection of Distress Inks :)

This card might soon be available in my Etsy shop - I'm just setting it up and shortlisting card designs :D

Friday 10 August 2012

Handmade Card: Happy Birthday Father-in-Law

It's my father-in-law's Birthday today :D Happy Birthday John! One of his great loves in classic cars, so what a great theme for a card. I went for a matching vintage style using papers from 'paper cellar', Distress inks (Brushed corduroy, Peeled Paint), cork letters and various stampers.


Handmade card: Punk grunge at 40

I thought I'd share a card I made for my cousin, back when he was 18 he went through a bit of a punk stage (Mohawk, bullet belt, leather and the like) I can remember being 8 at the time and to be honest a little scared by this drastic new look - I dug out the old photos and made this slightly grunge/steam punk inspired card for his birthday.
August and September seem to be the time for male birthday's in our family, so look out for more grunge inspired cards - there may even be some sneak peaks at styles soon to be available in my Etsy shop.

Monday 6 August 2012

Quiet book: Sandcastle page

The first completed page of Miss L's quiet book. This page was made from one of Stephanie's templates at imagineourlife. If you are thinking of making your own quiet book and need inspiration, it's well worth a trip to her site, she has some really amazing ideas - definitely a leading authority on quiet books.

I pretty much stayed to the pattern, although I did use slightly different felt colours to the ones suggested: I used cream for the sand, natural for the castles and tan for the doors and windows and the roofs. I changed the bucket colour to pink to make it more girlie with red rick rack stripes and swapped some silver cord for the handle instead of the felt. And I accidentally cut 2 extra 'towers' - but all the more for the kids to play with, lol!

It turned out perfectly, now just to work on the other pages :)

Sunday 5 August 2012

Spiderman Spiderman, wears a mask and ... jumps off my furniture

Oh dear, it's been 2 years but it looks like Lightning McQueen (from Disney Pixar Movie 'Cars') is no longer the biggest idol in our house. Make way for the Super heroes!
.
T-shirts, Wellies & backpacks are slowly but surely evolving and mutating from images of Cars with eyes to a certain red/blue suited web slinger and his friends! And while he still loves anything with wheels & will always be a petrol head more and more of his games seem to include wrestling his sister and jumping from the furniture to shouts of "Spiderman!" ... often followed by long explanations from me explaining that Spiderman is a goodie and doesn't intentionally hurt anyone or damage property.
.
Ultimately this has lead to requests for a Spiderman birthday party and a Spiderman dress-up costume for said Birthday - unfortunately his Birthday isn't till November, but trying to be the ever-prepared-mother that i am, I started Pinning Spiderman Party ideas and came across THESE simple but soo cute super hero mask templates by Jessica over at Cutesy Crafts and I decided to make the Spiderman mask as my weekend project, I ended up made 2 so he can play with a friend or his sister :D