Monday 24 December 2012

Christmas Eve Mincepies

It's a tradition in our house to make mince pies on Christmas Eve, often we make gingerbread too depending on time. This years design is based on Lorraine Pascale's pinwheel stars, and they came out quite well.


All you have to do is cut your pastry into squares, snip/cut at each corner, a spoon of mincemeat in the center, fold every second corner into the center [like this] dab a little beaten egg on the join and top with a star, glaze the rest of the showing pastry, bake, cool and then dust with icing sugar :)

Melted snowman fruit cake gift

One of the many lovely things Josh brought home from nursery this year was this melted snowman fruit cake. Technically this is a 'handmadebyjosh' and his teachers project, but it was such a good idea I thought I'd share.


About 3 weeks ago we were asked to send in empty clean 220g bean tins. I couldn't work out what sort of craft a nursery class could make with them - I had visions of them being used as plant pots or candle holders. And was very happily surprised to receive this cute cake. Very simple to do, you just used them instead of a baking tin. The cake is removed once cool, turned upside down, topped with a disc of icing, a ball of icing and decorations to look like a melted snowman and dressed up with corrugated card an cellophane to make a really sweet gift.


Sunday 16 December 2012

Happy Birthday Jason: A masculine travellers card

I need a card for the birthday of one of Mr S's best friends, and found this wonderful scrapbooking paper at my local crafting store. I couldn't resist sprucing it up with a bit of a travel theme and voila this card was born. One of the most 'me' cards for a long time, rather pleased it came out so well. I love the blue accent colours, although I wish I could have picked up on the red somewhere too.


Thursday 13 December 2012

Help! I'm drowning in Christmas Cards!!

The first batch of cards for nursery and a few friends is complete (and on going). Here are the first two designs, which I've been making in two sizes, 4x4 and 5x5. I've tried to keep the design quite simple as it had to be replicated so many times (cue: trip to my local craft shop more than once for more MME paper).:
 
 
I do have to keep asking myself why decide to make ALL of my Christmas cards this year? Especially considering Josh has 25 children in his nursery class and 5 teachers on top of the usual family, friends and neighbours ... the original reasoning behind it was that next year I want to launch packs of Christmas Cards in my Etsy online shop and take samples and pre-made/bagged tags and cards to some local craft fairs, and I figured practising making cards in quantity was good experience. What I hadn't counted on was the family having one illness after another for a month and no time to craft.
 
Right, no time to blog, back to the BigShot, guillotine and stamp pads :) Hope you are all having a lovely festive season, and good luck to those of you with projects of your own to finish! xx


Monday 26 November 2012

Almost december ... and I'm Feeling Summery

After our family holiday in St Ives in Cornwall this summer I was definitely feeling the love for VW Campervans. To the point I was researching second hand campers on the drive home. For now it is possibly a little impractical for our family particularly considering the carseats and my love of a good hotel mattress but you can't beat the iconic look of those lovely vehicles, and so we bought the kids a toy Camper van each and I treated myself to some VW Camper and Beetle style stamps.
 
 
I've already featured the stamps as part of my steadily growing Christmas tag range. But when I started experimenting with my more bright and summery distress inks I just couldn't stop and ended up with 7 vivid variations. I really love these bright colours against the monochrome camper and the natural twine give it a bit of a beachy feel!
 
[Now available at Etsy]
 

Super Hero Party: The finished result!

It's always nice when a plan comes together. Weeks of research on pinterest, brainstorming, cutting, gluing and baking finally came together. This time for my son's 4th Birthday Party. Amazingly this is the first children's party where I didn't feel rushed at the end, no sobbing into the regal icing, I even had time to go back and try ideas shelved as 'if I get time I might try that' - all helped by a few late nighters of course.


When we first started party planning my son quite liked Spiderman (you may remember the mask post back in August) then he quickly discovered other animated series the Super Hero Squad Show, X-men and the Avengers and so the party evolved into a more general 'Super Heros' party. I tried to represent all of his favourite characters in the food and party items: Hulk Jellies, Iron-man Biscuits, Captain America Cupcakes, Wolverine Cake, Thor's Cheese Hammers & Spiderman Invites ... we even had a telephone booth to change in....

Friday 23 November 2012

Showing some love for local crafting :)

Feeling the love today for local crafting. I discovered 'Sparkle Dreams' paper crafting shop and workshop at Studley Grange. Having lived in Wiltshire for 4 years, I have long bemoaned the fact that we have quite limited sources for good crafting materials - often having to resort to online shopping or my weekly pilgrimage to the crafting giant Hobbycraft.
 
 
How wonderful to discover an intimate little shop, around the corner with animated and passionate staff, offering a more personal service. It was a joy to be able to browse the racks, see and touch products I'd only seen photos of online. I was like a kid in a candy shop, with cries of "Tim Holtz!" and "I've not seen this MME paper before!" it was a revelation ... and probably a bit embarrassing to everyone I was with.
 
Don't get me wrong, I am a bargain hunter and will always shop around for my crafting needs, but for the joy and shear satisfaction of being able to touch and see what I'm buying might be worth overlooking a little price comparison now and then ;) Not to mention showing support for our local businesses.
 
NB:- Sparkle Dreams can be located at Studley Grange 16, M4 Motorway near Wroughton. The shop also offers regular crafting workshops. [Photo credit Sparkle Dreams]

Thursday 15 November 2012

Super hero party: Iron Man Biscuit Cookies

There are likely to be quite a few super hero party related posts soon, as for the past few weeks I've had my head down creating and baking for my Son's themed Birthday this Saturday.
 
Firstly here is a last minute idea of mine: Iron Man's hand biscuits (I'm British and just can't bring myself to call anything that isn't soft and chewy a 'cookie'). They are baked with coloured dough so they look effective without needing a rainbow of regal icing or a steady hand for royal icing flooding. Althou, if you want a quick version of these biscuits, simple make the red dough and then cut grey and white regal icing into circles to stick on afterwards. [Read more, for the receipe]


Thursday 1 November 2012

Handmade card: Teal and Brushed Corduroy

It's my step-mother's birthday today, so I can finally reveal the card I made for her. I used a mixture of papers, dies and inks. It's probably the most 'my style' card I've made for a while. Tried very hard not to over-work it. Love the paper colour combination and the vintage book page buttons.


Wednesday 31 October 2012

Happy Halloween 2012 Pumpkin Carving

Today we've carved our Pumpkins or 'Bump-kins' as my son calls them) made Skull cupcakes (update to follow) made Beef Stew and are now waiting for it to get dark so the kids can get dressed up and go trick or treating! Happy Halloween Everyone! And safe trick or treating. x


Tuesday 23 October 2012

Minnie Mouse Party

So sorry, this post appears to be 6 months late... As my son's birthday is fast approaching it occurred to me that on the bottom of the 'to be blogged' pile was my daughter's Minnie Mouse Party from back in June!
 
As it was the Jubilee we ended up having two parties in one weekend, and I have to admit that despite lots of early planning this one felt a little rushed, but it came together in the end and little lady had a great day. Click read more to see the full details...


Thursday 18 October 2012

Get well soon Laura: A Mojo Monday Card

A friend of mine had the misfortune of falling down the stairs yesterday - luckily nothing broken but tendon damage and crutches are definitely fun. So I decided to make her a 'Get well soon' card.
 
 
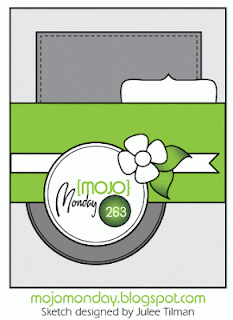
This had to be a quick card as I wanted to take it around today, so I used the Mojomonday sketch #263 from the Halloween card as my basis. The card was made using cardstock from K&Company's paper stack 'Poppy Seeds' and distress inks: Peacock Feathers Dusty Concord and Broken China. Dies are from Spellbinders and X-cut.


Wednesday 17 October 2012

Happy Halloween!!!

This is my first ever Halloween card, its not really a tradition to give them in the UK but then I managed to get my hands on the Fall set of Seasonal Distress Inks and was looking for an excuse to try them out.


I used this week's Mojo Monday sketch as a template, I tried to utilise my love of old book pages as much as possible so I could play around with some of the new inks (here I've used Distress Inks: Ripe Persimmon, Seedless Preserve, Black Soot and Antique Linen). I also tried out my new 'Sew-easy' kit on the edges - which wasn't as 'easy' as I'd hoped but I shall persevere, and if I ever get the hand of it I shall post a tutorial.


I decided to enter this card in the NMWC Halloween Creations Challenge and one of the requirements of the challenge was to use an image as the focal point, luckily I got the chance to borrow this amazing spider stamp from a friend. It's part of the 'Tim Holtz Stamp Halloween Blueprint Set'. I accented the 'spider' with Stickles in Black Diamond, and cut the stamp out using my circle punch, this is framed with a Spellbinders Picot Circles die-cut and handmade paper page rosette.

Saturday 13 October 2012

Etsy: Shop Launch!!!

Exciting news: The site's Etsy Shop is now officially open! I did a soft launch other day, just to test the format. The stock is mostly Christmas Tags at the moment but I'm hoping to add  Christmas Cards shortly and then a selection of personalised Birthday cards and Gift tags. So, please pop over and take a look!


Wednesday 10 October 2012

Burger Cupcakes [Suitable for Vegetarians]

I saw this concept on an old blog entry from Heather Taylor from "I do ... Inspiration" and fittingly I was Inspired. The photo that I had innocently found while researching superhero cupcakes on google images was that of Burger Shaped cupcakes! Some might say this idea is a bit kitch, naff or cheesy (burger pun) but I thought it was worth trying at least the once.
 
It's simply made by cutting a plain sponge cupcake in half across the horizontal, and then 'sandwiching' a disc of chocolate cake or brownie in between stuck together with Jam (for the tomato ketchup) and green buttercream (lettuce). I made my 'burgers' with some leftover chocolate cake but would have liked to have made the 'burger' with brownie for a difference in texture. If you have any, sesame seeds would also look the part (scattered over the top during baking).
 
I only made a small batch of these to try out the idea, my willing Guinea Pigs tomorrow are: Jac, Nicola and all the little ones :) Although I have to admit I've also made some traditional butterfly cakes and the kids decorated a few vanilla sponges cupcakes with pink buttercream - so something for every there hopefully.
 
 
*- please note the title of this blog  entry is meant in jest, obviously the suitability for vegetarians depends on the recipe used - but the vast majority of cake recipes will not involve the use of meat, although any recipe using eggs, milk or butter will not be suitable for vegans.

Tuesday 9 October 2012

Happy Birthday Dad!!!

Last year my Dad's Birthday card was a turning point for me, I deciding that I was never going to buy another card again, and have managed to make 95% of the cards I sent this year. My card making techniques and experience has come on leaps and bounds.
 
 
Last year's card (below) was inspired by Dad's boyhood hero "The Loan Ranger" and made using a sheet of My Mind's Eye (Lost and Found) "Boy Cowboy" 12x12 Paper and I hand cup the lettering from gold card. This year I couldn't help but continue the Cowboy  (above) - the letters were still hand cut, but from cork board. I die cut the tag from a sizzix combo set, and aged paper from Paper Cellar with Walnut stain and Black Soot, I also aged a Kraft 6x6 card blank. The Sherif badge is from a carboot sale and the horse shoe charm. The prima flower is from Dovecraft and the butter is a Marianne Creatable.


Handmade Card: Music, Twine and Time

My Step-Mum asked me to make a card for her Nephew as he was turning 30, my brief was simple: Something like my previous men's cards and he likes music. As I don't know Sam personally and can't ask if he minds having his baby photos blogged - I've done a bit of 'crime watch' style pixilation on the photo - Sorry if it spoils the effect somewhat, but I'd hate to offend someone by using their photo without permission.
This card was actually completed a while ago, but after it got lost in the post (1st class Royal Mail) and I thought it was a little cruel to do a 'and this is the card you could have had' post, lol. Luckily it turned up eventually (over a week later) so I finally think I can share it.


Monday 8 October 2012

New Distress Ink, My little ritual

Most people I know who collect craft supplies such as Distress Inks have their own little ritual for cataloguing and organising them. As I've purchased quite a few lately I've been thinking a lot about how I go through the same routine every time I get a new Ink - so much so that I've got it down to military precision (well, almost).

You may have already seen my colour chart that doubles as storage for my blending pads posts and it's really filling up now, so each new ink has to it's own place. I also have colour charts in both my A5 folder and pocket Filofax - not to mention the task of labelling of the ink pad itself.
 
 
Firstly, I open up all the new inks that need cataloguing (I usually buy 3 at a time on offer so it pays to be methodical) in this case I'm using the example of the 'Spring' limited edition seasonal inks. Each ink gets new blending foam pad from inkssentials at ranger. And I start by filling in the large colour chart. To limit the ink colour to the correct square I use post-its to mask all 4 edges. This is always my first proper taste of what the colour will actually look like so its quite exciting. Once dry I pop a square of sticky-backed Velcro in the centre (which will grip to the back of the foam pad once I've finished).
 
Next I take some scrap paper (here I used 3 unused pages from an old Filofax) and ink once in each colour. From this I cut 3 pieces: a 5cm by 1cm rectangle, a 1 inch butterfly punch, and a 1.5 cm bow punch.
 
The Butterfly fits perfectly in my resized A5 (sadly the seasonal inks have to go on the back for this sheet as I didn't originally allow for these). The bow fits into the boxes on my pocket filofax sheet (with extra boxes added here for the seasonal inks).
 
The 5cm by 1 cm strip goes on the side of each ink - this way I can see the colour easily when they are stacked, and quickly compare colours when using them together. I also take a silver pen from my papermania metallic bullet tip set and write the name on the side so they are easy to identify and there is no accidentally 'getting the wrong lid on the wrong ink' situation.

And that's my little ritual ... I feel much better for having shared, lol. This post also marks on official halt on Distress Ink purchasing still Christmas :( But apparently people need present ideas. That said when I started looking into Halloween cards and craft I have realised how I am seriously lacking I am in Oranges... [must controll buying impulses, must controll buying impulses]

Sunday 7 October 2012

Mojo Monday #261: Christmas

Here is my second card for the Mojo Monday competition this week. I went with a Christmas theme because it's getting to be that time of year AND it was a great excuse to break into my new Spellbinders Heirloom Ornaments (2010) set.


I also got to use my favourite Christmas sentiment stamp and (now, my reinker has arrived) I got to use lots of Brushed Corduroy and a bit of Aged Mahogany, and it wouldn't be a card from me at the moment without a page from an old book and a button (in this case a Marianne Creatables.
 
 
Here is the lovely sketch by Julee, why not head over to their site to check out all the amazing entries - some great inspiration there for all styles and techniques of cardmaking :)

Saturday 6 October 2012

Happy Birthday Emily! A Mojo Monday card.

It's my cousin's birthday today! Happy Birthday Emily! I decided to make her card but wasn't sure where I wanted to go with it until I realised it was Mojo Monday. I like this weeks sketch and have made two cards using it this week.


As Emily is a teen I put my trusty Brushed Corduroy down and steered myself towards the bright end of my Distress Inks range including my brand new Peacock Feathers (from the Spring limited editions), Milled Lavender, Dusty Concord and a little Broken China.


I also used a few distress techniques I've not tried before including scrunching up a plastic bag and flicking water. The scalloped edge on the circle is hand cut with Scallop Scissors from, the circle is from a 2inch X-cut punch and the tag is a die cut from a Sizzix scallop combo set. The dot paper (which continues on the inside) is from a paper stack from K&Company called Poppy Seeds.


I'm fairly happy with how the card turned out. I think the 'emily' letter could have been larger - I think I may need to invest in some larger font stamp sets, not to mention Birthday sentiments!


Thursday 20 September 2012

First Christmas Card of the year (inspired by Mojo Monday)

Well, I'm not normally one for starting my Christmas cards early but with sets of Christmas tags under way for Etsy I'm feeling a little festive and what better way to get my creative juices flowing than to take part in a challenge, using Mojo Monday's sketch as a basis for a new design. I really liked this weeks sketch, think I'll be referring back to it for some future projects.


Here's how the card turned out, I use my trusty distress inks: Brushed Corduroy, Walnut Stain, Victorian Velvet and Aged Mahogany, the stampers (in ranger archival ink: jet black) are from my new set of 'Lost and Found Christmas' stamps by My Mind's Eye, the card base is a 6x6 Kraft card. The rosette is made with a distressed doily and an old page of a book, and the embellishment is a flattened beer bottle cap with a snowflake circle with room for a name (for when I finally decide who's getting this card).
 
 
Here is Julee's sketch, isn't it pretty? I'm looking forward to using it again when I have circle dies and materials at my disposal :) Check out all the other fabulous enteries HERE
 
Mojo Monday Blinkie

Friday 14 September 2012

What's in your filofax Friday #3

See, and you thought this feature wouldn't be back again ;) As the last post was so popular I couldn't resist sharing a filofax project I've whipped up.


This is my Mum's filofax. It's a black A5 Domino organiser from .... well, probably the dark ages. I think you'll agree it has seen better days (despite the fact that for this photo I hid 3 inches of loose elastic) and is probably in need of a nice cosy retirement on some bookshelf somewhere, but while a replacement is no-where to be seen I decided to help 'spruce it up a bit' starting with some dividers (similar to the ones you may have seen in filofax week #3).
 
Firstly I must state that I'm not condoning purchasing 'faux' filofax products, but if you did want to personalise yours with a bit of D.I.Y crafting then funky dividers are a quick and simple way to go.
 
You can basically use any card for this: wallpaper samples, scrapbook card, standard coloured card - you can even use stamps, inks and embellishments to make something totally unique (I'd advise trying to keep your creations as flat as possible so that your filofax actually closes, but there are lots of possibilities to choice from).


Materials used:
Paisley monochrome A4 card
A set of old dividers (as a template)
A single hole punch - or use an official filofax punch
Scissors
Pencil


The formula is pretty obvious:
Draw around template/s & mark hole sites > Cut out > Punch holes > Put it to use
 
If you have a full set of dividers simply draw around those, or as in my case where I'd borrowed one divider you can space them yourself or even cut straight rectangle dividers and make your own tabs (dies such as sizzix Tim Holz Alterations 'tiny tabs 'might work well for this).


I also added a couple of beads and a knot to tighten the loose elastic around the domino - I admit it's not the neatest job, but will hopefully suffice as a quick fix and certainly looks better than all that loose elastic.
 
It would be really nice to see a range of official filofax dividers, other than the basics, maybe themed to co-ordinate with colours in the range or perhaps limited editions designed by guest designers (I'm sure there is a market for Louis Vuitton or Gucci dividers) but until then we have scrapbook papers and wallpaper samples - the makers of FIlofax please take note ;)

Thursday 13 September 2012

Cake: The Trash Can Pack / Trashies

I volunteered to bake a cake for my Nephew's birthday last week. Apparently he's really into the 'Trash Pack' and Trashies toys -he has the bin and the dump truck. Now, I've only ever seen the TV advert so a little research was needed, but I quickly decided that in the time scale a 'Trash can' cake was the most straight forward with a surprise bright green cake inside.

This is a basic guide to how I made the cake - although I'm sure there are far easier or more professional ways to achieve the same cake. I didn't have a lot of time to plan and shop for this cake, so everything had to be available from my local asda or my own store-cupbaord - with more planning I'd have located some 5" round baking tins and bought more dowels and ready coloured grey and green sugar paste.
Cake:
(using a 12" by 6" rectangular tin)
14oz Self Raising flour
14oz Butter
14oz Caster sugar
7 medium eggs
2 tsp baking powder
2tsp vanilla essence
Gel food colouring: green

Icing:
1 tub frosting/buttercream
1 kg ready to roll white icing
Gel food colouring: green, black and yellow
Gold luster


Firstly I made a large rectangular cake using the recipe above (if you have small enough round tins use these instead and you will have less wastage), which I have adapted from my basic sponge measurements. After preheating my oven to 170°C I cream the sugar and butter, then adding the wet and dry ingredients alternately. I added the green gel at the end so I could judge the brightness of the green. I used asda natural colouring gel, most gels will work well, but avoid the liquid colouring. To add the gel I coated the bottom part of a cocktail stick in the gel and swirled it around in the cake mixture to release the colour before turning the mixer back on, I binned the leftover stick and repeated the process 3-4 times.

Baking times will vary depending on the size of tin, but for mine it took 30 minutes, although I was expecting between 45-1 hour for a thicker cake.


Once cooled I cut the large cake into 4 individual 5 inch cakes, I levelled the tops and stacked them with frosting between each layer and using a dowel rob for stability ... again, ideally I'd have used 4 evenly spaced dowels and cut them to size but time was an issue and as it had to be transported I left the dowel in (which I tried to hide a bit with the 'lid' handle). The cake did 'slouch' a little by the end as a result of the lack of even support, but I like to think it added to the 'old trash can' look of the cake.

Once assembled, I crumb coated the whole cake in frosting (store bought betty spoon as a time saver) and refrigerated for half an hour.

Now the interesting part, the icing. Firstly I died most of my 1kg of white ready roll icing grey using black food colouring gel - you can buy ready coloured icing from sugarcraft and specialist shops if you have more notice. Then I rolled out a large rectangle of icing and cut it to straighten the edges and measured to the height of cake, I placed the cake onto the rectangle and rolled the cake up in it, cutting at the overlap and using a sugar craft tool to bleng the join a little.

Placing the cake upright I then rolled out a circle to cover the top of the cake. And used a ball shaped sugar craft tool to make grooves around the cake to look like the indentations on the outside of the 'trash can'. Next I died most the remaining white icing green to match the inside of the cake and cut 'oozy dribbles' to go around the cake, I hid the tops of these with a long flat 1 inch piece of grey icing - which was supposed to look like part of the lid.

To one side I used more green icing to cut the letters 'j-a-c-k' and the number 5 out, and laid a 1 inch strip of grey icing over a stack of two flat wooden spatulars to dry out and give it a 'handel' shape. the remaining tiny bit of white icing was then died yellow, formed into 'screw' shapes and painted with gold luster.


The cake went down very well, the kids all liked the shape and theme of the cake while the adults where impressed with the favour of the sponge (despite the vivid green colour, lol).

Handmade card: Happy 70th Birthday Uncle Don

For my Uncle's 70th Birthday I was asked to make an additional card for the occassion. It was quite tricky coming up with 2 unique cards for one occasion, and I spent so long on the other card I ended up with litterally 45 minutes to design and make my own card (also the first official outting for my sizzix big shot).
 
 
This is the first card, as my Uncle was once an Elvis Tribute act and played the clubs, I wanted to theme the card around it. My starting point was this old photo, which I aged with distress ink around the edges (Antique Linen). I recently discovered my old badges collection, so threw in this lovely pin - which almost acts as a title. I added a vintage playing card (found the pack for 20p at a carboot sale). I hand cut the cork lettered and distress inked (Peeled Paint and Pine Needles) - really need to invest in some number dies now I have the bigshot. And embossed and distressed a ticket from the tri-boss range.
 
 
This is the 45 minute ,and actually I quite like the way it turned out - there are things I'd have done better, but I quite like the simple layout. I stamped a sentiment on the background with ranger jet black archival ink. And now for the bigshot: I cut the the photo and cork frame with Xcut's Square Parenthesis nesting frames, and the bookplate from Xcut's tags set. I added buttons to the bookplate and a flower.

Monday 10 September 2012

Upcoming updates

Well it's all go in our family at the moment; birthdays, house moving, BBQs, painting & decorating, and nursery starting ... not to mention the accociated card making, cake decorating, cooking, sewing and other side projects. (Plus Mr.S's race running and toe breaking)
 
 
In all the chaos it's been tricky to find time for a proper update, but I promise more is coming soon!!! For now here is a sneak peek at my new toy...
 
 
... eeek!!! Previously I've held off buying any of the die cutting machines, prefering to muddle through with my punches and handcutting skills, but Christmas came early when this arrived :D So, expect lots of new projects involving my brand new Big Shot :D
 

Tuesday 28 August 2012

New card: Happy house moving Mum!!

It's been about 8 months in process but today my Mum's new house has finally gone through and she has the keys in her hands! So what better excuse to create a new 'new home' card :D
 
 
I distressed some cardstock and added the vintage key stamp to the background in Archival - Jet Black. Then added the orgami house - made from an upcycled book page which was also distressed. Added a bright background and key charm, bottle cap, dovecraft flower and ribbon.

Friday 24 August 2012

Fairy Toadstool Card: Happy Birthday Edie-Jean

Time for an other distress ink card :) This time a girlie version - desinged for my cousin's daughter Edie-Jean's Birthday on Saturday. I've been dying to use these new little fairy charms and ended up designing the card around it.
 
 
The Distress ink colours were: Victorian Velvet and Brushed Cordoray. With an upcycled book rosette, bottle cap name, masked toadstool and tiny personalised letter from the fairies :D
 

What's in your filofax Friday? #2

Well, it looks like Santa came early. I showed Mr S the state of my old filofax and as he's just spent a small fortune on new running gear for the Great Yorkshire Run he offered to get me a new one ...
 
 
I'm rather embarrassed about the amount of time I've spent hugging it! lol. It's the pocket sized Malden in vintage pink and it's gorgeous.


Most of the pages are still the same, my 21p memo pad fits perfectly into the back pocket and I've used some black and white scrapbook papers to make some smart dividers (top right) - including a section for card making. For this section I resized a distress ink colour chart (middle right) from ranger, a memento ink colour chart (bottom right) which I downloaded from Ellen Hutson and I created some 'card design' sheets for sketching down my ideas when out and about (middle left) again I based this on the templates from philofaxy :)

Wednesday 22 August 2012

Distress Ink colour chart: The start of an obcession

Last month I finally dove head first into the wonderful world of Tim Holtz's 'Distress inks' from Ranger. I have to admit I previously I thought they were just over priced ink colours and never gave them a second thought, then I discovered the series of Tim Holtz videos on YouTube and I knew I had to start collecting them. Perfect for the aged effects I've spent years attempting with good old fashioned tea bags (lol!) and that's not beginning to mention the blending and water blotting techniques.


As an avid collector and list maker I was pleased to find that the ranger website offer a free A4 pdf colour chart. I love the idea of checking the colours off as I collect them. I've already printed one for my folder and resized one for my filofax (see this Friday's filofax update).


While looking at ways to store my new inks I discovered Britta's series on 'No-Stress Distress Inks' and I instantly adopted her method for labelling the sides of the inks  with the titles and colour as its so much easier to keep track of them once stacked. I also liked her method of storing the foam pads on Velcro on a large version of the ranger colour chart, but wanted to use a bigger foam board - so I ended up printing her enlarged version, cutting the grid out, covering the board in brown paper and stencilling the title in sharpie marker and adding addition sets of boxes for each of the 'limited edition' seasonal colours (the titles are stamped on).

So far I have: Brushed Corduroy, Peeled Paint, Pine Needles, Broken China, Black Soot, Victorian Velvet, Tumbled Glass, Antique Linen, and Walnut Stain. I already have my eye on the next 3 ;)