
My little girl's 2nd birthday is coming up and I'm planning a Minnie Mouse Party, but hoping to do as much of it myself and avoid the commercial partywear as much as possible, so keep your eyes peeled for a party special. But first I need to send out the invites, they're so simple to make I thought I'd share a quick tutorial on them for all you crafty parents out there - in fact this one is so simple older children will be able to help too.

* Friends and family please spot the 'deliberate mistake' with the date on this first batch of invites, lol

What you will need:
White A4 paper
Black Card
Pink dotty ribbon
Scissors
A circle cutter (optional)
Adhesive (eg- high tack tape)
5"x5" Envelopes
The below template (click to get original size)
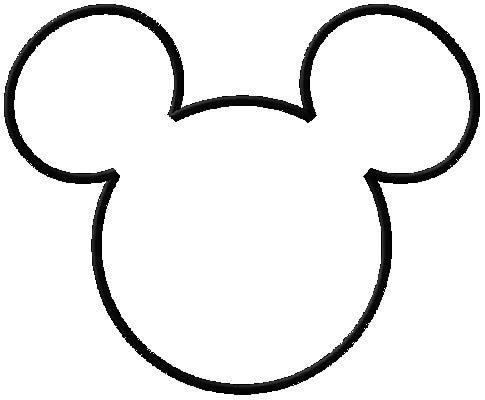
Firstly print the mickey mouse template (click on image to get original size and then save or copy and paste into word). Then on a new word document use the 'insert shape' tool to draw 6cm circles and the text box tool to add your party information and print. I can recommend the fun Disney style font Walter. Alternatively, cut 6cm circles with your cutter and write the information by hand.

Next use your circle cutter to cut out the party information panel. Cut out your mickey mouse outline, and use a pencil to draw around it as many times as will fit on each piece of black card (I think I managed 4 per A4) alternatively use your circle cutter to make one large and two small circles and overlap slightly.

Now take a length of ribbon and tie into a bow (I ended up getting them to the right size and then adding a single stitch to hold them in place but this isn't essential). Now simply take your three elements and stick together, I used a high tack tape roller mouse to attach the information panel and glue dots to attach the bow. Now just repeat the process as many times as required.

I absolutely love this. I don't have daughters but have a niece who will be turning 2 very soon and I would love to make these. Very well explained too, thanks.
ReplyDeleteThanks for this. This is perfect for my daughters 1st birthday :)
ReplyDeleteThank you for the tutorial! I also took your template and made it really small to use as cupcake toppers with a toothpick glued in between two cardstock ears. Thanks again!
ReplyDelete